

What Is Best Form Of Concrete To Use For Repair
How to Set up Sidewalks That Are Chipped and Pitted
Updated: Jun. 24, 2022
Roll down your sleeves and put on a dust mask. Making a durable patch is a dusty, grimy affair.

Extend the life of old concrete by fixing broken, crumbling areas before the problem gets worse. A properly done repair will last decades. We'll evidence you lot how to create a durable physical patch to fix two of the most common problems: spalling and broken corners.
You might too similar: TBD
- Time
- Complexity
- Price
- A full day
- Intermediate
- Less than $20
Concrete Patch: Size upwardly the job before you begin

Masonry bract
A corundum masonry blade grinds through physical, but slowly. A diamond blade costs more than but cuts much faster.
Concrete is hard stuff, but don't let that intimidate you. With the proper tools and techniques nosotros evidence in our photograph serial, even a novice can brand a durable patch, first try. Sawing concrete with a special masonry bract (opening photo) may be new to you, but if you've handled a circular saw, y'all'll rapidly get the hang of information technology. It'southward less hazardous than sawing wood. Even so, the blade kicks up an incredibly thick cloud of abrasive dust, so be sure to wear goggles to protect your eyes, ear protection, gloves and a grit mask, every bit well as old clothes.
Size up the job first. Before commencement whatever repair, assess the general condition of the concrete slab. (See "Patch or Supersede? " beneath) Sometimes the best strategy is to suspension out an entire section and repour it with new concrete rather than patch information technology. Patching works best for local impairment in otherwise audio physical.
We won't bargain with the other mutual problem, cracks. You can repair them exactly as we bear witness here, just they'll near probable return unless yous can stabilize the concrete slab to forbid the movement that acquired the cracks in the first place.
If this is your commencement concrete repair project, allow about a half twenty-four hours to pick up materials and complete 2 to 3 patches. Information technology took united states about four hours from start to cease to complete the ii repairs we show here.
Complete the task during comfortable working conditions, ideally in dry weather with a temperature between 50 and lxxx degrees F. Both you and fresh physical happen to concord on this 1. Fresh concrete is easiest to handle and hardens best (a procedure technically chosen "setting" and "curing") in this temperature range. Colder weather condition lengthens the setting time; freezing temperatures can ruin the concrete. Hotter weather causes faster setting and drying; the slab may harden before you can smooth it. Or the surface can dry too fast and non harden properly, somewhen causing it to spall. In hot atmospheric condition, work in the cooler mornings or in the shade.
Patch or Replace?
Should y'all patch your old physical or completely tear information technology out and repour it? While at that place's no hard and fast rule, hither are some tips to guide your decision:
- Assess the severity of the impairment. If your driveway is full of spalled areas and broken edges, the surface is probably severely weakened. It'll continue to deteriorate, and chances are the patches won't last.
- Telephone call in a concrete contractor (Search "Concrete Contractors" on your browser) to help you appraise the situation and inquire for a price on consummate replacement. But keep in mind that contractors are in the business organisation of selling concrete. With their labor costs, it's normally cheaper for them to replace than repair. Nosotros had trouble finding a contractor who would even exercise patching.
- Is appearance important? A patch will be lighter-colored than the quondam concrete. Even afterwards weathering for a few years, the new patch will probably however stand out. One fashion to hide the patch is to stain the unabridged surface to blend the old with the new. Just you'll have to renew the stain periodically.
- How much are you willing to spend? Material costs for a repair are low. Pros would want to completely supercede the slab to insure a loftier quality result. The price would be substantial.
Repair spalled areas: Cut out the damage
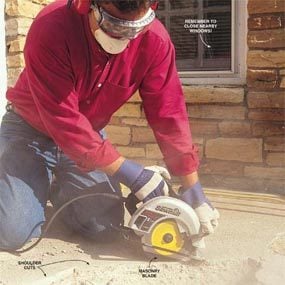
Photo ane: Cut around the chipped area
Cut a three/eight-in. to ½-in. deep "shoulder" around the edge of the spalled area with a saw and masonry bract. Movement the saw slowly as you lot cut. Make sure you cut back into solid concrete to ensure a strong bonding surface.
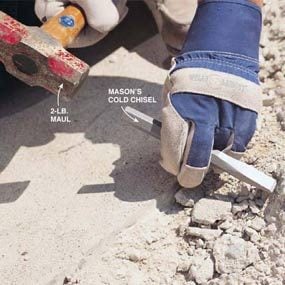
Photograph 2: Chisel out weak areas
Break out all weak and loose physical with a maul and cold chisel. Sharp physical chips will come flying out, then clothing safety goggles.
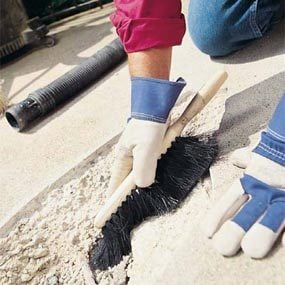
Photo iii: Castor away debris
Clean the chips and dust from the repair area with a broom or shop vacuum. Be thorough. So mix the patching textile.
"Spalling" is the mason'south term for concrete that's pitted or chipped, as in Photo 1. The cardinal to a lasting repair is to make a saw cut around the perimeter of the damaged surface area, cut back to solid concrete. The cutting should be at least three/8 in. deep: Most repairs that neglect practise so because the patch is likewise sparse at the edges and breaks off. Fix a masonry blade (encounter above) at a five-degree bending so the cutout is slightly wider at the bottom than at the top. This helps "lock in" the patch (Photo 1). Slowly guide the saw through the concrete. The masonry blade grinds a groove, so don't put a lot of pressure on the saw; let the blade practice the work. Cut virtually 1/iv in. on each pass. A diamond grit bract can cut the physical about v times faster than a masonry blade, and it won't habiliment out equally fast. But it also costs more. The extra cost is worth it if you take more than most x ft. of concrete to cut. Or salvage money—and time—by renting a diamond bract (about a day, plus wear fee), or a concrete saw with diamond bract.
Tip: You'll raise an impressive dust cloud when sawing, then close upwards nearby windows and doors. Otherwise, you'll exist housecleaning, too!
Once yous've cut and thoroughly cleaned loose concrete from the repair area (Photos 2 and 3), moisten the expanse with a wet sponge earlier packing in the concrete mix. Don't get out standing h2o in the patch area; use simply enough to dampen the former concrete and aid it bond to the new.
Repair spalled areas: Pack in the repair mix

Photograph 4: Moisten and fill
Moisten the patch area with a moisture sponge. Then pack in the patch mix with a wood float. Leave the mix slightly higher than the surface of the old concrete.
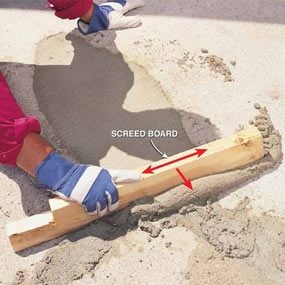
Photo v: Screed off the excess
Screed off the excess cloth by sliding a board side to side in a sawing motion while pushing it forwards. If you find low spots, pack in more than mix and screed off again.
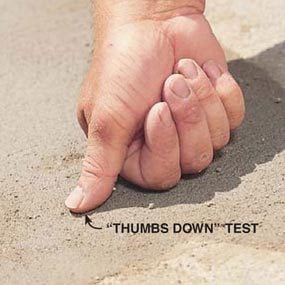
Photo 6: Permit the concrete stiffen
Test the firmness of the patch past lightly pressing your thumb on the surface. When your thumb no longer leaves an indentation, go ahead and finish the surface.
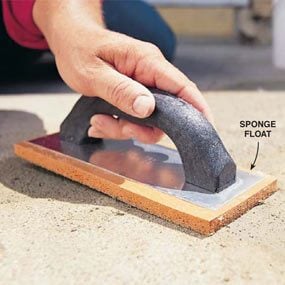
Photo seven: Bladder the surface
Lucifer the texture of the one-time, crude physical by rubbing the surface of the patch with a sponge float. Use a steel trowel for a polish end or a stiff bristle broom for a lightly grooved finish.
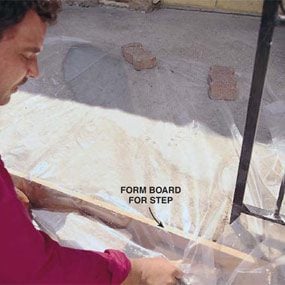
Photo 8: Cover with plastic
Cover the patch with plastic to retain the wet. Weight down the edges to proceed the plastic from bravado off. Concrete requires moisture to cure properly.
For your patching mix, use either a prepackaged sand mix or concrete mix, depending on the depth of the patch. (See "Apply the Correct Patching Mix, " below.) Each 60-lb. pocketbook makes virtually i/2 cu. ft. of concrete, enough for a two-in. thick patch about 1 ft. wide by three ft. long. Judge the volume of patching material past multiplying approximate length, width and thickness (in feet) to go far at cubic feet, and buy a fleck more than you think you'll demand. Meliorate to take also much than to fall a few scoops short!
Mix it with water and acrylic fortifier, following the mixing directions on the package. The fortifier strengthens the new physical and helps information technology bond better to the old concrete. The mix should be only wet enough to hold together when information technology'due south troweled into the repair. Don't add too much water. It'll result in weaker physical.
We used a normal sand mix, which sets hard plenty to walk on in about a day or two. It continues to cure and harden for weeks. If you lot have to use the expanse right away, you can buy a special fast-setting concrete, which hardens in virtually an 60 minutes. It costs nearly twice as much and y'all won't accept every bit long to spread and shine it, so stick to the regular mix when possible. Most building supply dealers that carry regular concrete also carry the fast-setting blazon. Subsequently mixing the concrete, pack it firmly into the repair area using a wood float (Photo 4), the tighter the better. Mound the mix then it's slightly higher than the old concrete. Then immediately level information technology fifty-fifty with the sometime physical using a straight board (Photo v).
Begin finish trowel piece of work when the surface moisture starts to evaporate and the patch begins to harden. Information technology may but be 10 minutes on a warm day or perhaps an 60 minutes on a cool day. I sign of evaporation is the loss of some of the surface gloss. When the patch appears to be getting stiff, examination it with your thumb (Photo vi). One time the surface is about as stiff as the peel of a grapefruit, begin the terminate work. Nosotros used a sponge float (Photo 7) to match the slightly rough texture of the old physical. A sponge bladder has a rough rubber surface. If you want a polish surface, apply a steel trowel; for a lightly grooved appearance, elevate a stiff-bristle broom across the surface.
After using a float on the surface, embrace the patch with plastic for two days. The plastic helps the physical retain the moisture, which the physical needs to cure and strengthen (Photograph 8).
Caution!
Wet physical is highly element of group i and can cause severe burns to bare skin. Immediately wash off whatever that gets on your skin with cool water.
Use the Correct Patching Mix
Concrete mix consists of sand, gravel and Portland cement. The gravel reduces shrinkage, so it won't crack as readily when laid in thick. However it may not bond well in thin layers. Sand mix (sometimes chosen topping mix) consists of sand and Portland cement. It's easier to trowel in thinner layers (to virtually ane/4 in. minimum) for thinner patches or patches with thinner edges. Withal, if y'all apply it thicker than 2 in., its natural shrinkage might cause it to crack or suspension the bond with the old concrete. In a nutshell: Use a sand mix for repairs less than 2 in. deep. Use a physical mix for repairs deeper than ii in. Replace 50 to 80 percent of the water with the acrylic fortifier in either mix to amend the patch'southward bonding strength.
Concrete Patch: Repair broken corners
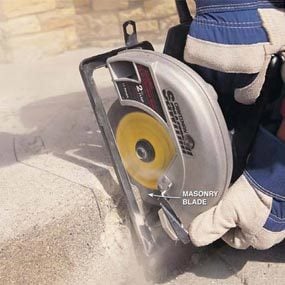
Photo 9: Cut effectually the stride damage
Square off the edges of the broken step with a masonry bract. Bit out loose and weak physical with a cold chisel.
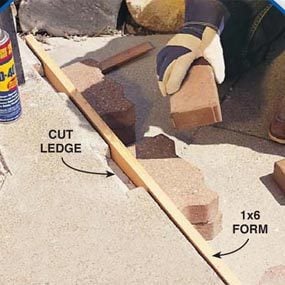
Shut-upwardly of Photo nine
Cut the underside of the break too to make a firm ledge.
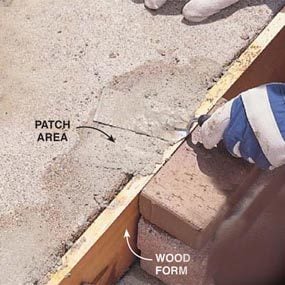
Photo 10: Form the repair and pack in patching mix
Anchor a form board confronting the side of the stride, moisten the expanse and pack in the repair mix. Screed off the excess patching textile.
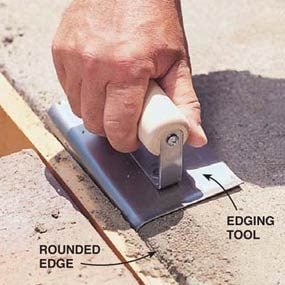
Photo 11: Circular the edge
Slide an edging tool along the footstep edge to circular it. Use the edging tool merely if the old step portion has a rounded edge.
Use the same basic patching technique for a broken corner as for spalled areas, just add three key steps.
- Create a ledge for the patch to make a stronger bond with the sometime physical (Photos ix and x). Don't be afraid to make the cutout well beyond the edges of the original damaged area. Smaller patches simply won't hold also as larger ones.
- Prop a wood course tightly against the vertical portion of the step to hold the concrete patch in place (Photo 10). Block the class confronting the pace with bricks or other heavy objects. Tip: Coat the wood grade with motor oil or WD-40 to go on the concrete from sticking to the forest.
- When the concrete begins to set, utilize the edging tool to create a slightly rounded edge to match the step (Photograph 11). Then remove the form board (carefully, considering the concrete is still soft) and cease all exposed surfaces with a float or trowel to lucifer the texture of the old concrete. Cover the patch with plastic and let it cure for at to the lowest degree two days before walking on information technology.
Required Tools for this concrete patch project
Have the necessary tools for this DIY project lined up before y'all starting time—you lot'll save time and frustration.
You will also demand a 2lb. maul, wood float, sponge float, edging tool, broom and a masonry blade.
Required Materials for this physical patch project
Avert last-infinitesimal shopping trips by having all your materials ready ahead of time. Here'south a listing.
Originally Published: June 24, 2022

What Is Best Form Of Concrete To Use For Repair,
Source: https://www.familyhandyman.com/project/how-to-fix-sidewalks-that-are-chipped-and-pitted/
Posted by: gonzalezhinfore.blogspot.com
0 Response to "What Is Best Form Of Concrete To Use For Repair"
Post a Comment